
Hosting Your Jekyll Site on AWS with S3 and CloudFront
In our last post we described how to install Jekyll on a Cloud9 environment, with the website source stored in git in CodeCommit. In this post, we’ll describe how to host that site on AWS statically, via S3 and CloudFront. This is an incredibly cost effective way to host a site – and, as you’ll see, your web pages will load incredibly fast from anywhere in the world.
SSL Certificates with AWS Certificate Manager
Even for static websites like this one, the public expects a secure browsing experience, so you simply must host your site over https. To do this, you need an SSL certificate for your domain, properly configured for the webserver that is hosting up your site. In the past, that was a time consuming and expensive process, but AWS has you covered here: so long as you actually use the certificate with your website hosted on AWS, it’s free. And it’s pretty easy.
Navigate to your AWS console, then go to the AWS Certificate Manager
service. Click on Provision Certificate, and then – this is very important –
switch to the us-east-1 region, no matter what your standard region is.
We will be configuring CloudFront to use this cert, and that only works
with certs that are in us-east-1.
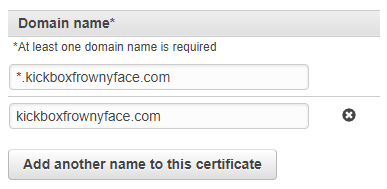
We’ll be hosting the website at www.[YOUR DOMAIN].com, but we may as well
ask for a wildcard cert as long as we are doing this. Further, you’ll want
to protect your bare domain (i.e., with no subdomain) in the same cert:
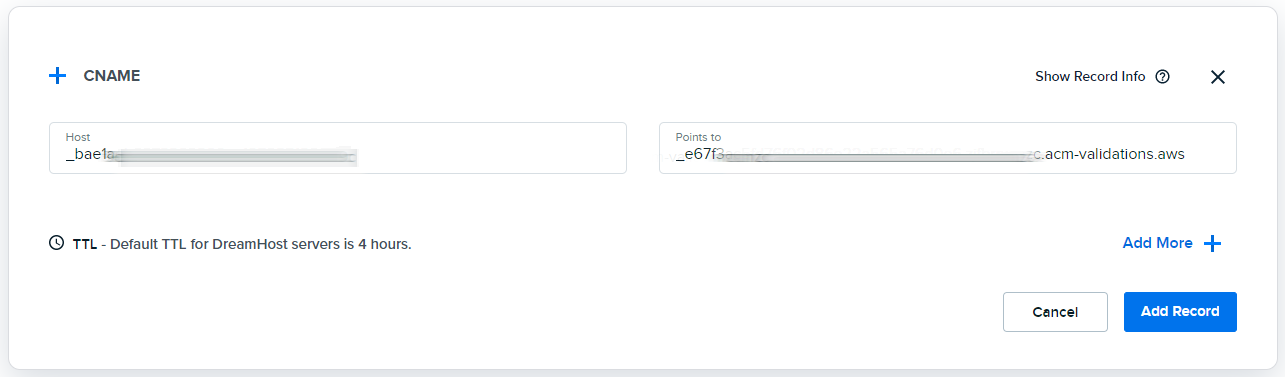
Next, you will have to prove that you have ownership of the domain. You can do this in one of two ways: either via an email process, or a DNS process. The DNS one is cleaner; all you need to do is set up a CNAME with the key and value that ACM provides you with. The Kickbox domain uses DreamHost as DNS provider, because it’s cheap and good enough, so we created a CNAME on the domain with the details that ACM gave us:
It can take some time for your DNS provider to serve it up, and for AWS to notice that it exists – so you can either get a cup of coffee and come back, or move on to the next stage while you’re waiting.
Serverless Framework on Cloud9
Here at Kickbox Frownyface we are big fans of the Serverless Framework, which standardizes, to some extent, how you interact with cloud providers. Even though we are all in on AWS, we think it really simplifies maintaining infrastructure as code. And it’s free.
So let’s install Serverless on our development box.
Log into your Cloud9 instance, and then issue this from the terminal:
$ npm install -g serverless
...
$ sls --version
Framework Core: 2.18.0
Plugin: 4.4.2
SDK: 2.3.2
Components: 3.4.7
Configure your S3 Bucket
We will be using S3’s static website hosting feature for the site that Jekyll is going to build for us. Instead of going into the AWS console and clicking around, we are going to create a YAML file that describes our S3 bucket fully, and then have Serverless take care of spinning it up and maintaining it for us.
The infrastructure configuration files for our website are going to go
into a directory sibling of website. So create a directory parallel
to where our Jekyll work goes:
├── kickbox-web
│   ├── infra
│   └── website
│       ├── 404.html
...
Into this infra directory we’ll put s3.yml, which will specify an
S3 bucket that will contain the Jekyll site as built (i.e., the static
HTML pages, styleshets, images, and so on for our site). It looks like this:
Resources:

  # The bucket holding the static site
  JekyllBucket:
    Type: AWS::S3::Bucket
    Properties:
      BucketName: ${self:custom.s3Bucket}
      AccessControl: PublicRead
      WebsiteConfiguration:
        IndexDocument: index.html
        ErrorDocument: index.html
      CorsConfiguration:
        CorsRules:
          - AllowedHeaders:
              - '*'
            AllowedMethods:
              - GET
              - HEAD
            AllowedOrigins:
              - '*'

  JekyllBucketPolicy:
    Type: "AWS::S3::BucketPolicy"
    DependsOn: JekyllBucket
    Properties:
      Bucket: !Ref JekyllBucket
      PolicyDocument:
        Statement:
          - Sid: PublicReadGetObject
            Effect: Allow
            Principal: "*"
            Action:
            - s3:GetObject
            Resource: arn:aws:s3:::${self:custom.s3Bucket}/*
This sets up a bucket that S3 can host statically, with public read
access. Note that the ${self:custom.s3Bucket} and the like are going
to be filled in appropriately by Serverless when we deploy our
infrastructure.
(A quick note about public read: normally you would want to have
CloudFront, our CDN, to be the only entity allowed to read from that
S3 bucket. However, the way Jekyll builds out directories and index.html
files means this won’t fly. A public S3 bucket is OK for us because
our website is fully public anyway – but if your use case is different,
you may want to make a different choice.)
Configure CloudFront as CDN
Next, we will set up CloudFront to serve files from that S3 bucket. To do this, we’ll create another YAML configuration file, this time for the distribution:
Resources:

  ## The CF distribution for the front end
  JekyllCloudFrontDistribution:
    Type: AWS::CloudFront::Distribution
    Properties:
      DistributionConfig:
        Origins:
          - DomainName: ${self:custom.s3Bucket}.s3-website.${self:provider.region}.amazonaws.com
            Id: WebApp
            CustomOriginConfig:
              HTTPPort: 80
              HTTPSPort: 443
              OriginProtocolPolicy: http-only
        Enabled: true
        Aliases:
          - ${self:custom.subdomain}.${self:custom.domain}
        DefaultRootObject: index.html
        CustomErrorResponses:
          - ErrorCode: 404
            ResponseCode: 200
            ResponsePagePath: /404.html

        # The default cache behavior: standard pages
        DefaultCacheBehavior:
          AllowedMethods:
            - GET
            - HEAD
            - OPTIONS
          ## The origin id defined above
          TargetOriginId: WebApp
          ForwardedValues:
            QueryString: true
            Cookies:
              Forward: none
          ViewerProtocolPolicy: redirect-to-https
          Compress: true
          DefaultTTL: 2628000
          MinTTL: 2628000

        ## The certificate to use when viewers use HTTPS to request objects.
        ViewerCertificate:
          AcmCertificateArn: ${self:custom.sslCertArn}
          MinimumProtocolVersion: "TLSv1.2_2018"
          SslSupportMethod: sni-only

## In order to print out the hosted domain via `serverless info` we need to define the DomainName output for CloudFormation
Outputs:
  JekyllCloudFrontDistributionOutput:
    Value:
      'Fn::GetAtt': [ JekyllCloudFrontDistribution, DomainName ]
A few things to note about this file: we have a very long “time to live” set up for these files. That’s because our site is, after all, static – and performance will be better (and cost lower) the longer those files are at CloudFront’s edge. This means every time we rebuild our Jekyll site, we need to invalidate the CloudFront cache. (We will do this automatically in our next step; stay tuned.)
Serverless Configuration
Finally, we a single configuration file for the Serverless framework that
references these two files. The standard name for this file is serverless.yml,
so create one in the infra directory that looks like this:
service: jekyll-web

custom:
  account: '[YOUR ACCOUNT ID]'
  certificate: [CERTIFICATE ID]
  domain: [YOUR DOMAIN]
  sslCertArn: arn:aws:acm:us-east-1:${self:custom.account}:certificate/${self:custom.certificate}
  stage: ${opt:stage, self:provider.stage}
  subdomain: ${self:provider.environment.${self:custom.stage}_subdomain}
  s3Bucket: [BUCKET NAME THAT WILL HOLD YOUR SITE]-${self:custom.stage}

provider:
  name: aws
  stage: prod
  region: [YOUR PREFERRED AWS REGION]
  environment:
    dev_subdomain: dev
    prod_subdomain: www

resources:
  - ${file(s3.yml)}
  - ${file(cloudfront.yml)}
What wer’e doing in this file is setting up values for the variables in the s3.yml
and cloudfront.yml files. You will obviously need to edit this for your own circumstances:
you will need to put in your AWS account ID, what region you run your infrastructure
in, and so on.
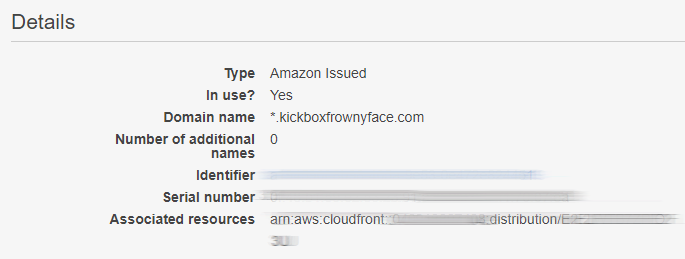
The only non-obvious part step here is that you need the SSL certificate ARN (that stands for AWS Resource Name), so that CloudFront knows how to secure your site. How do we get this?
By now, Amazon Certificate Manager should have verified that you own the domain in question, by looking for that CNAME setting in DNS that you set up at the start of this process. So pop back over to your console and see if the certificate has been issued. If so, you can click on Details and see this:
 )
)
You want the Identifier, smudged out here.
Deploy Your Infrastructure
At this point our project directory looks like the following, with the Jekyll source
in website and the infrastructure support in infra:
├── kickbox-web
│   ├── infra
│   │   ├── cloudfront.yml
│   │   ├── s3.yml
│   │   └── serverless.yml
│   └── website
│       ├── 404.html
Now that the hard work is done, you can simply tell Serverless Framework that you want your site built out:
$ sls deploy
That’s it! Serverless will use these files to create CloudFormation scripts and post
them as stacks to your AWS account, using the privileges in your Cloud9 instance.
This will generate an S3 bucket, configured for static website hosting, and a CloudFront
distribution pointing to it, properly configured to be serving up content, securely
via your SSL certificate, at https://www.[YOUR DOMAIN].
(Of course, you will have to add a CNAME for www pointing to your CloudFront domain,
so that www.[YOUR DOMAIN] actually points at your website. If you don’t know how to
do this, check with your domain registrar.)
But how, you might ask, do we get our Jekyll site up into that S3 bucket? Well, that is the topic of our next post, automatically building and deploying Jekyll on AWS with CodePipeline.